Proper strapping technique is the difference between a pallet that arrives intact and one that collapses in a shipping container. Whether you’re using the Velmorian VON1 or still on manual tools, this guide covers the correct process from start to finish.
Before You Start: Strap Placement Rules
A pallet needs minimum 2 straps — but most applications need 4. Follow this rule:
| Pallet Height | Number of Straps | Placement |
|---|---|---|
| < 60cm | 2 | One near top, one near bottom |
| 60–120cm | 4 | Top, bottom, and 2 evenly spaced middle |
| > 120cm | 4+ | Add extra middle straps as needed |
⚠️ Critical: Always strap the narrowest dimension of the load. This prevents the boxes from spreading apart.
Step 1: Prepare the Pallet
- Ensure the pallet is on a flat surface
- Check that all boxes are aligned and flush
- Add corner boards (optional but recommended for heavy loads)
- Verify you’re using the correct strap type (PET for heavy/long transit, PP for light/short transit)
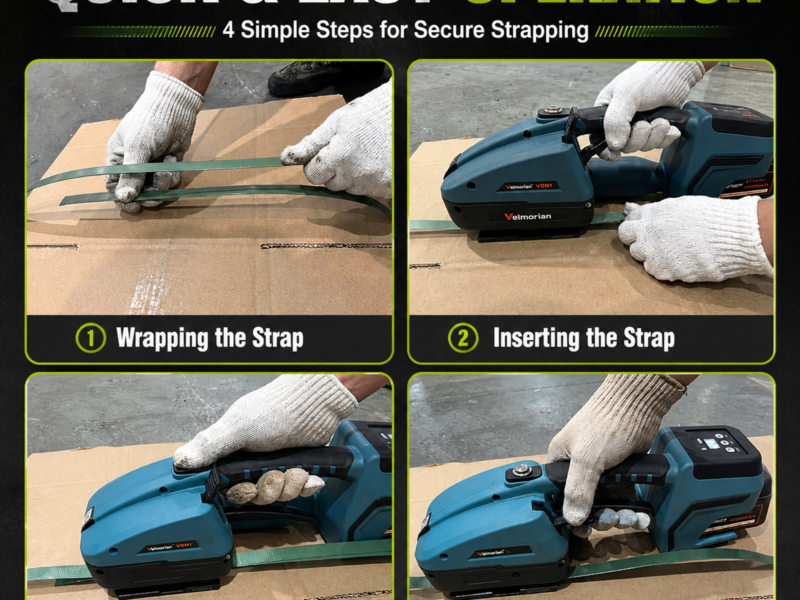
Step 2: Feed the Strap Around the Load
- Pull enough strap from the roll to go around the entire pallet + 15cm extra
- Slide the strap under the pallet
- Bring both ends up and overlap them on the side of the load
- Insert both ends into the VON1’s strap feed slot
💡 VON1 tip: The auto-feed function pulls the strap tight around the load automatically — no need to manually pull slack.
Step 3: Tension the Strap
- Use the tension dial on the VON1 LED screen to select your target tension:
- Lightweight loads: 800–1500N
- Mixed loads: 1500–2500N
- Heavy loads: 2500–3500N
- Press the green tension button
- The VON1 will pull the strap tight and automatically stop at the preset tension
✅ Check: The strap should be tight enough that you can’t slide a finger underneath it on the pallet deck.
Step 4: Weld the Strap Ends
- Once tension is complete, the VON1 will automatically advance to the welding phase (or press the weld button if your unit requires manual trigger)
- The machine will:
- Vibrate the strap ends together at high speed (friction)
- Melt the strap material at the joint
- Cool briefly to set the weld
- The weld time is automatically calculated by the VON1 based on strap thickness
⚠️ Don’t touch the weld joint during or immediately after welding — it’s hot!
Step 5: Cut the Excess Strap
- Press the cut button (red)
- The VON1’s built-in cutter will trim the excess strap flush with the weld joint
- Visually inspect the weld — it should be smooth and uniform
✅ Weld quality check: Try to peel the weld apart by hand. If it separates, the weld was insufficient — increase weld time in settings and retry.
Step 6: Repeat for Remaining Straps
Rotate the pallet (or walk around it) and repeat Steps 2–5 for each strap position.
For 4-strap pallets, the recommended sequence is:
- Bottom strap (stabilizes base)
- Top strap (prevents toppling)
- Middle straps (consolidates center)
Common Mistakes to Avoid
| Mistake | Why It’s a Problem | Fix |
|---|---|---|
| Strapping only the top | Load can shift sideways | Always do top AND bottom |
| Using too wide strap | Doesn’t fit in VON1 feed slot | Use 12–19mm PET or 12–16mm PP only |
| Over-tensioning cardboard | Crushes boxes, damages product | Use 800–1200N for cardboard |
| Ignoring weld quality | Weld fails during transit | Always hand-test the first weld of each shift |
| Not checking battery level | Tool dies mid-pallet | Swap batteries at 20% remaining |
##VON1 vs Manual: Process Comparison
| Step | Manual Tool | VON1 Electric |
|---|---|---|
| Feed strap | Manual | Auto-feed |
| Tension | By “feel” (inconsistent) | Digital preset (repeatable) |
| Seal | Metal seal + crimp tool | Friction weld (no consumables) |
| Cut | Separate cutter tool | Built-in one-button cut |
| Total time | ~3 minutes | ~30 seconds |